A Simple Guide to Overclocking a NerdQaxe++
Author
This is a guest blog post written by Bolster, you can follow him here: x.com/Bolster_15

Overclocking a NerdQaxe++
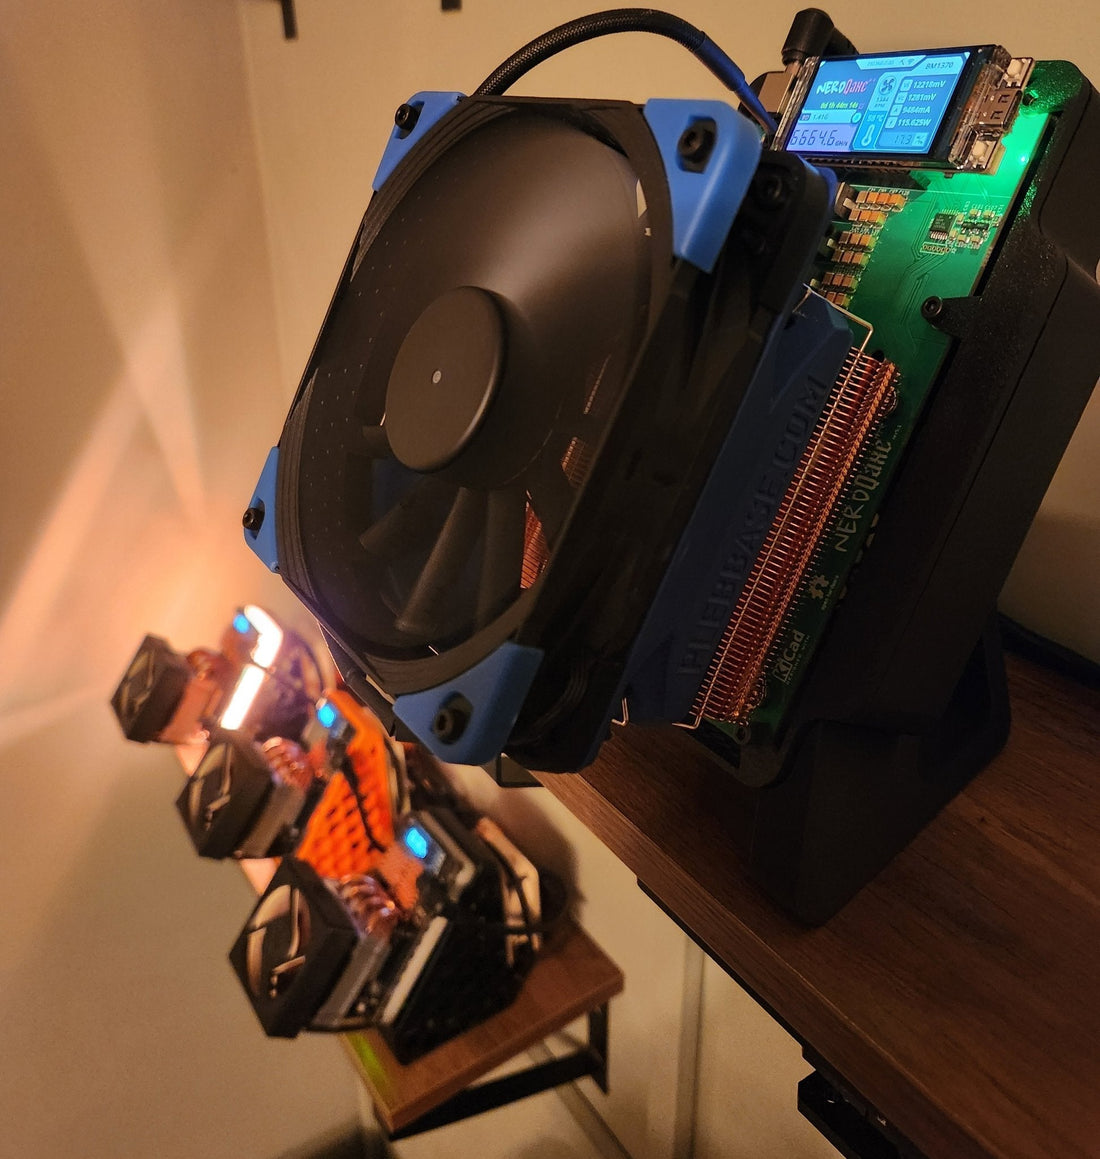
The NerdQaxe++, a 4.8 TH/s Bitcoin ASIC miner with four BM1370 chips. This can safely hit ~6.2–6.5 TH/s when overclocked, boosting your mining power but raising heat and energy costs. Overclocking risks hardware damage, higher bills, and a voided warranty, so proceed carefully with incremental tweaks and constant monitoring. This guide assumes you’re familiar with the NerdQaxe++ and AxeOS interface.
Prerequisites
Hardware Upgrades
Power Supply (PSU): The stock 12V/10A PSU can’t handle overclocking. Consider upgrading to a Mean Well RSP-350-12 (350W, 12V) to support ~110–115W for moderate overclocks.
Fuse: The stock 8A fuse fails above ~100W. Swap it for a 12A or 15A Littelfuse 451 NANO2 series (e.g., 0451012.MRL or 0451015.MRL) to match your PSU.
Power Cable: Use a 16 AWG cable for ~110–115W overclocks. For 15A fuses, go with 14 AWG. The GINTOOYUN 90-Degree DC Power Pigtail (5.5mm x 2.5mm, not 2.1mm) is reliable and safe.
Cooling: The stock Thermalright AXP90 X36 cooler works up to ~100W but struggles beyond. Upgrade to the AXP90 X47 (per @trendkraft’s tests at plebbase.com) and add a HELIX shroud (free 3D-printed design) with a 120mm fan to keep ASIC below 60°C and VRM below 60°C.
Don't forget new thermal paste, MX-6 works well, others are available.
Software Tools
Access the AxeOS web interface via a browser on any device . No extra software needed.
Update to the latest firmware from Bitaxe GitHub for stability and overclocking support.
Optional: Use mining pool dashboards (e.g., web.public-pool.io) for real-time hash rate.
Baseline Testing
Run the NerdQaxe++ at stock settings and track hash rate, ASIC temperature, and power usage via the LILYGO T-Display S3 or AxeOS.
Connect to a mining pool and stress test for 1–2 hours to confirm stability (no crashes or hash rate drops).
Note baseline frequency and voltage for reference.
Step-by-Step Overclocking Process
Access AxeOS Interface
Connect to the NerdQaxe++ via Wi-Fi and log into the AxeOS web interface using a browser.
Go to the Overclocking or Settings tab and enter the “Danger Zone” to tweak frequency and voltage.
Adjust Frequency and Voltage:
Increase Frequency: Start at 600 MHz and raise by 25 MHz (e.g., to 625 MHz) to avoid instability.
Adjust Voltage: If the hash rate drops or the ASIC “starves” (low power), increase voltage by 25 mV (e.g., 1100 mV to 1125 mV). Keep voltage low to minimize heat.
Test Stability
Mine for 30–60 minutes after each change and check hash rate, ASIC , VRM , and power draw via AxeOS or T-Display.
Ensure hash rate stays stable (e.g., within ±250 GH/s). Large fluctuations or crashes mean you’ve gone too far—lower settings immediately.
Test and Benchmark
Run a 1–2 hour test on a mining pool to verify stability. Compare average hash rate to stock (4.8 TH/s vs. 6.2–6.5 TH/s).
Use AxeOS for manual monitoring or pool dashboards for detailed performance data.
Monitor and Fine-Tune
Continuously monitor ASIC and VRM temperatures. If exceeded, reduce settings or improve cooling (e.g., HELIX shroud).
Confirm input voltage stays ~12V to avoid throttling. Expect ~110–115W for moderate overclocks.
Save stable settings in AxeOS to persist after power cycles.
Tips for Success
Cooling First: Prioritize VRM cooling. The HELIX shroud with a 120mm fan is a game-changer and free to 3D print.
Small Steps: Adjust frequency and voltage gradually (25 MHz, 25 mV) to find the sweet spot for performance and stability.
Reliable PSU: The Mean Well RSP-350-12 is rock-solid for overclocking. Don’t skimp on power quality.
Community Help: Join the Bitaxe OSMU Discord for real-time tips and settings from NerdQaxe++ users.
Firmware Updates: Check Bitaxe GitHub regularly for AxeOS enhancements.
Risks and Warnings
Warranty Void: Overclocking may void the 90-day warranty from vendors. Check with your supplier.
Hardware Damage: High voltage or poor cooling can fry ASIC chips or VRMs. Keep temperatures in check.
Power Costs: Overclocking to 6.4 TH/s bumps power from 76W to ~115W, raising costs. Balance this with your hunt for that block!
Instability: Aggressive settings can cause hash rate drops or crashes. Revert to stock via AxeOS web flasher if needed.
Summary
Upgrade to a Mean Well RSP-350-12 PSU, 12A/15A Littelfuse fuse, and 16/14 AWG cable for ~110–115W. Add a HELIX shroud and AXP90 X47 cooler to keep ASICs and VRs cool. Via AxeOS, increase frequency (25 MHz steps) and voltage (25 mV steps) , aiming for 6.2–6.5 TH/s. Test stability for 1–2 hours on a mining pool. Join the Bitaxe OSMU Discord and check Bitaxe GitHub for support and updates.
Final thoughts, the new upgrades are heavy, make sure you have a quality stand. A free 3D print can be found here: makerworld.com/en/models/1167970-nerdqaxe-case-with-stand?from=search#profileId-1175777
Shout-out to @trendkraft’s insights at plebbase.com. And @PowerMiningFarm for building this amazing miner.